LeanDESIGNER ClickOnce installation (MsSQL database)
This article describes the LeanDESIGNER ClickOnce installation, both server and client side, with database on MsSQL. It applies for LeanDESIGNER 1.0.20 or higher. For previous versions, please contact Hyperlean support.
1. Introduction
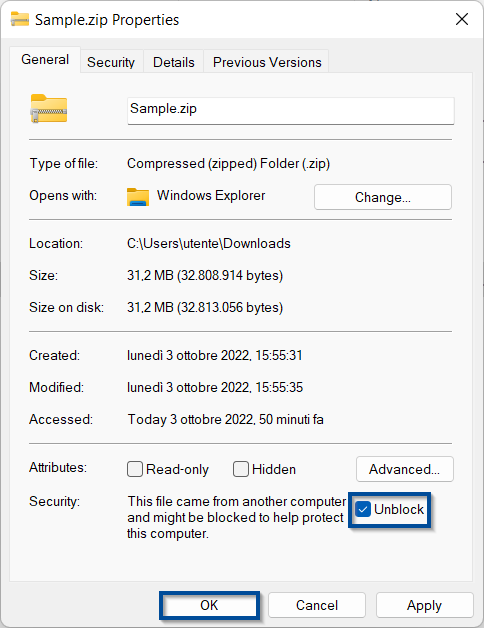
To install LeanDESIGNER you’ll need to download some files from a few links: you shall check for each “.zip” file you download that it does not have a security block and eventually disable it, by applying the following procedure:
- Right-click with the mouse on the downloaded “.zip” file
- Select “Properties” option in the context menu which will open and then go to the tab named “General”.
If the “.zip” file is blocked, you will see the button or the box “Unblock”. In this case:
- Press “Unblock” button or tick “Unblock”.
- Press “Ok” to save the changes.
2. ClickOnce Technology
ClickOnce is a Microsoft technology which allows to create Windows applications with automatic update and that can be installed with minimum user interaction. The core principle of ClickOnce is to ease the deployment of Windows applications and it aims to solve three problems with conventional deployment models:
- Difficulties in updating an application. With Microsoft Windows Installer deployment, whenever an application is updated, the user must reinstall the entire application; with ClickOnce deployment, you can provide updates automatically. Only the portions of the application that have changed are downloaded. So, the application is updated on a client machine without any interaction by the user.
- Impact on the user’s pc. With Microsoft Windows Installer deployment, applications often rely on shared components, with the potential for versioning conflicts. With ClickOnce deployment each application is self-contained and cannot interfere with other applications.
- Security permissions. Windows Installer deployment requires administrative permissions and allows only limited user installation. ClickOnce deployment allows also non-administrative users to install and grants only those Code Access Security permissions necessary for the application.
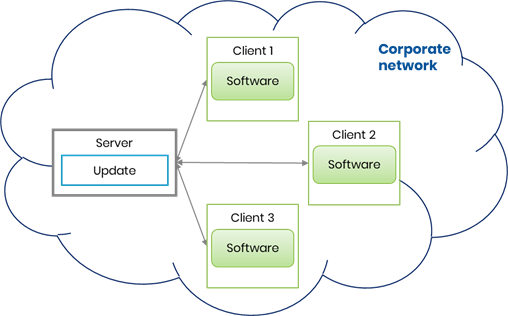
Thanks to this new technology, you only need to install LeanDESIGNER ClickOnce on a server and you do not have to install LeanDESIGNER through the install-package (.msi) on a client machine. Moreover, to update LeanDESIGNER on a client machine, you only need to run LeanDESIGNER on it and not to install the new LeanDESIGNER version.
3. Server-side configuration
Server-side, there are two main topics to highlight:
- License installation
- Creation of a shared folder containing the material, data and ClickOnce deployment
The shared folder can be created in the same server where LeanDESIGNER license is installed or in a different one.
3.1 License installation
First, you need to install the driver to manage the license by following next procedure:
- Download “LicenseDriverInstallation_8.41.zip” from Dropbox.
- Unzip the downloaded “.zip” file. The folder “LicenseDriverInstallation_8.41”, obtained from the unzip, contains the following 4 files:

- Run as administrator the file “InstallLicenseDriver.bat” (right-click à “Run as administrator”) to install the license manager driver.
- Check if the service Sentinel LDK License Manager is running, otherwise start it. To check it: write “Services” on Windows search bar.

Go to folder “LicenseDriverInstallation_8.41” and:
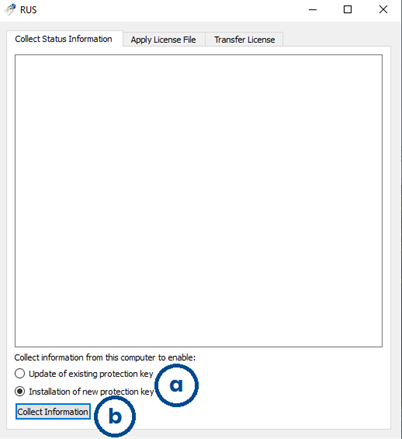
- Double-click on “RUS_GEWKM.exe” to run it
- In the “Collect status information” tab
- Select “Installation of new protection key”
- Click on “Collect information” button
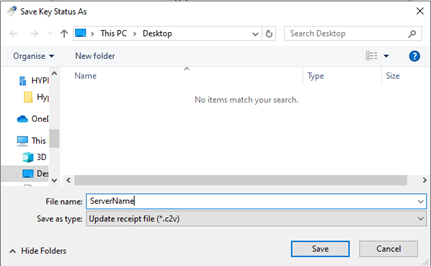
Save the related “C2V” file (fingerprint) with the name of your server.
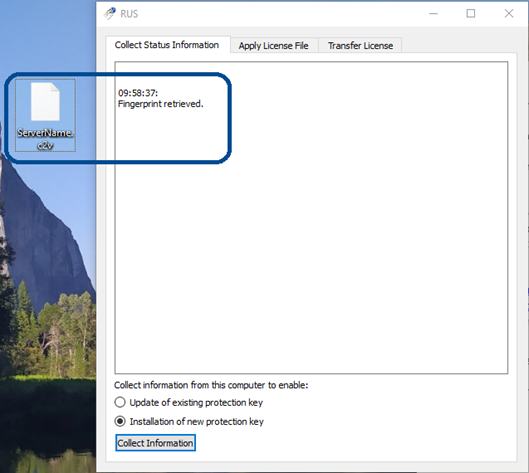
Send the fingerprint file by email to support@hyperlean.eu.
NOTE: “C2V” files do not contain private customer information. They contain information about the license terms and data stored in deployed Sentinel protection keys. For further information, please visit the provider’s webpage.
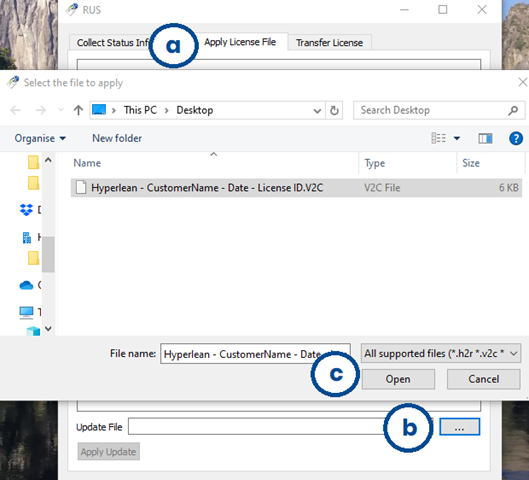
Hyperlean Support will send you back a “V2C” file that allows you to activate the license. To apply the file run “RUS_GEWKM.exe” then follow next steps (shown on next images):
- Select “Apply License File” tab
- Click the three points button to upload the “.v2c” file received by Hyperlean Support
- Click on “Open” button to open it
- Click on “Apply Update” button
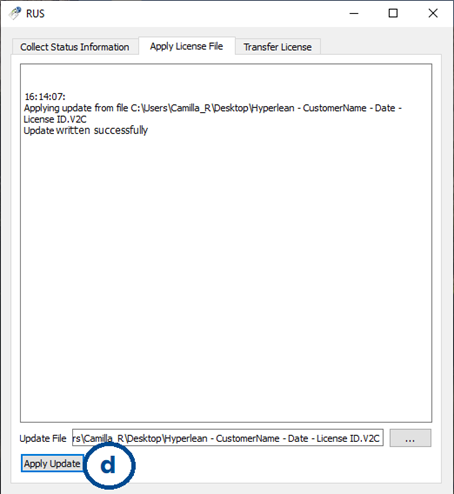
Open a browser and go to http://localhost:1947/int/devices.html to check if the license has been installed. If so, you will see a line like the one in the next picture.

3.2 ClickOnce deployment configuration
In this chapter we describe how to configure the server choosen to host the LeanDESIGNER ClickOnce deployment.
Creation of a shared folder
The first step is to create a shared folder called “LeanDESIGNER” with read permissions for all LeanDESIGNER users. Inside this folder, create the following subfolders:

- “Documentation” store here the guides Hyperlean sent you.
- “LeanDESIGNER_Deploy” this folder must contain two subfolders:
- “ClickOnce” extract here the contents of the “LeanDESIGNER_X.x.x_ClickOnce.zip” folder folder send by Hyperlean
- “Settings” extract here the contents of the “LeanDESIGNER_ClickOnce_Settings.zip” folder folder send by Hyperlean

Set the ClickOnce deployment path
It is necessary to configure a “.bat” file to set the path of LeanDESIGNER ClickOnce deployment.
Go to the “Settings” folder and open the “Change_LeanDESIGNER_distribution.bat” with a text editor.
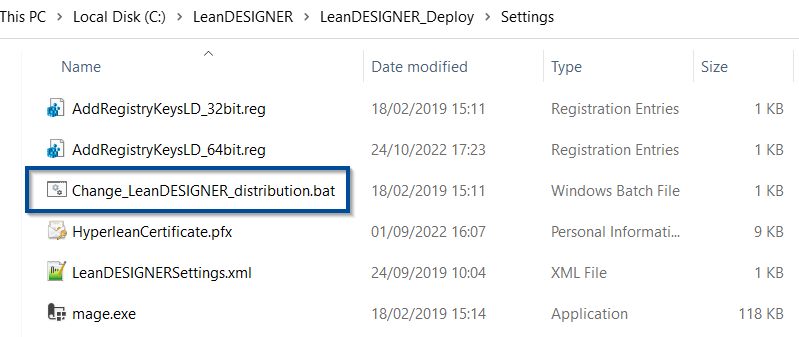
Add the net path to “LeanDesignerLauncher.application”, that is stored in the “ClickOnce” subfolder, as shown in the picture below:

Save the customized “.bat” file and execute it on the server, by double-clicking on it.
3.3 Database creation
In this chapter we describe how to create a LeanDESIGNER database on your SQL server.
Preliminary steps
Before you create the database, you must:
- Select or create an instance on the MsSQL server database where to upload LeanDESIGNER databases.
- Recover the port used for the remote connection to MsSQL server (by default it’s 1433).
- Create a specific user with the role of db_owner of the “LeanCOSTDB” and “LeanDESIGNERDB” databases. We suggest you name the user as “leanuser”. It is not necessary that this user has ”System Administrator” rights.
Database creation
The first step to do is to restore two “.bak” files received from Hyperlean to create the “LeanCOSTDB” and “LeanDESIGNERDB” databases.
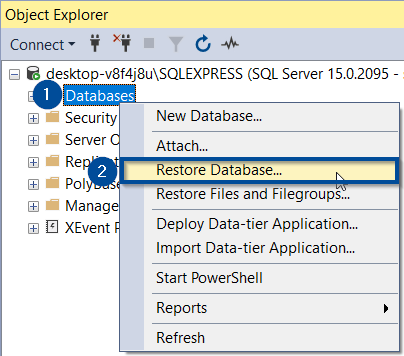
Log-in the instance where the databases will be stored and right click on the “Databases” node, then select “Restore Database…” in the context menu.
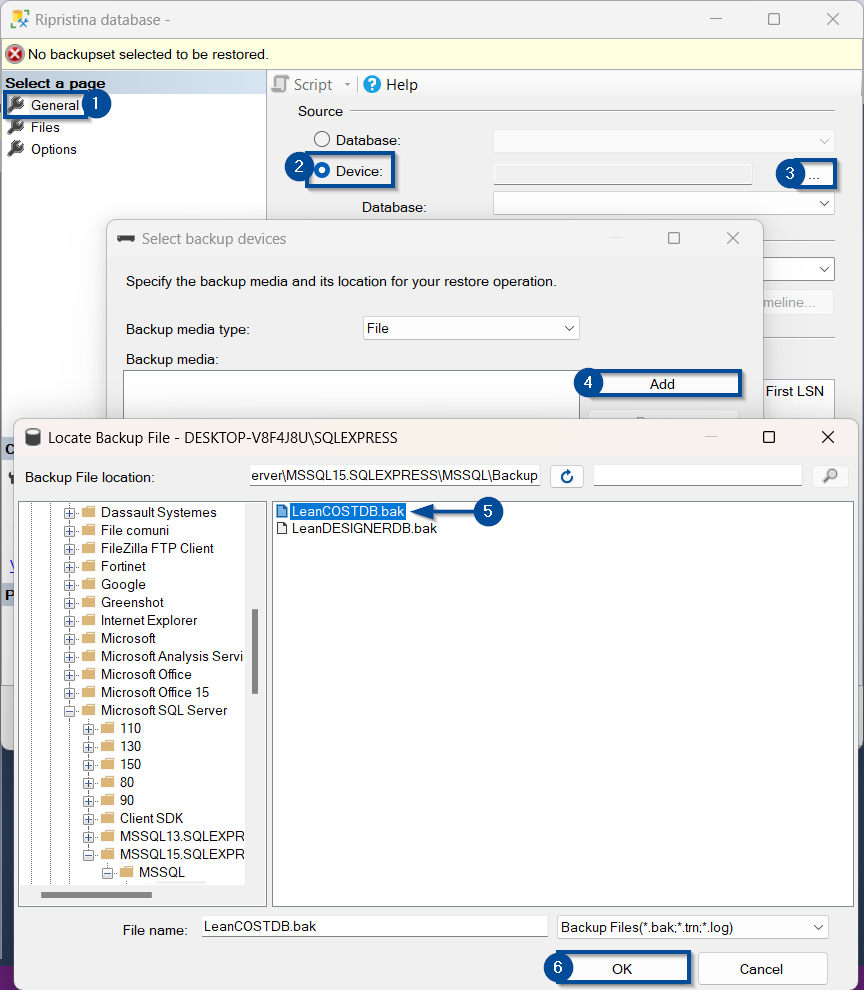
The “Restore Database” window wil open: here follow the steps shown in the next picture.
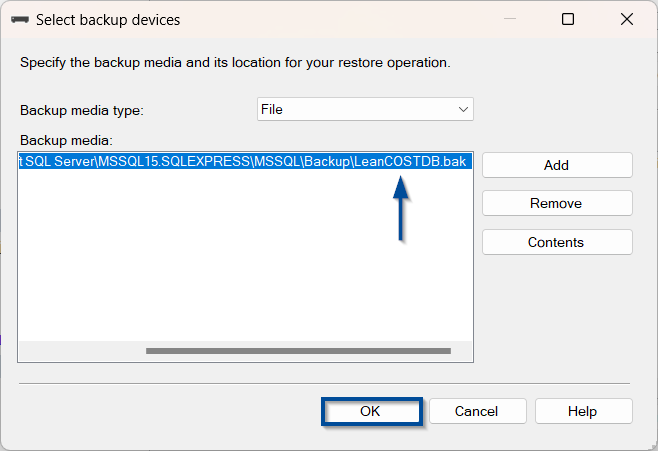
Once pressed “OK” at step 6 of the previous image, the path of the file “LeanCOSTDB.bak” to restore will appear in the “Select backup devides” window: here press “OK” to go on with the restoration.
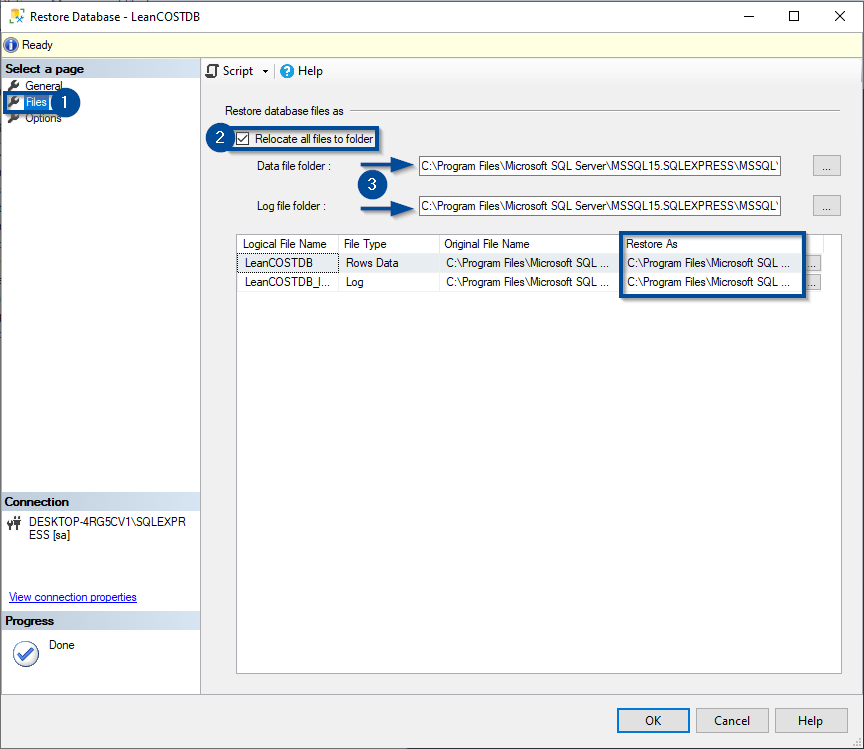
After having pressed “OK” you’ll be redirected to the “Restore database” window.
If you want to change the path where the data and log files will be savedelect “Files” in the left menu, check “Relocate all files to folder” and type the desired path in the “Data file folder” and “Log file folder” textboxes.
Make sure the paths are correct in the “Restore As” column.
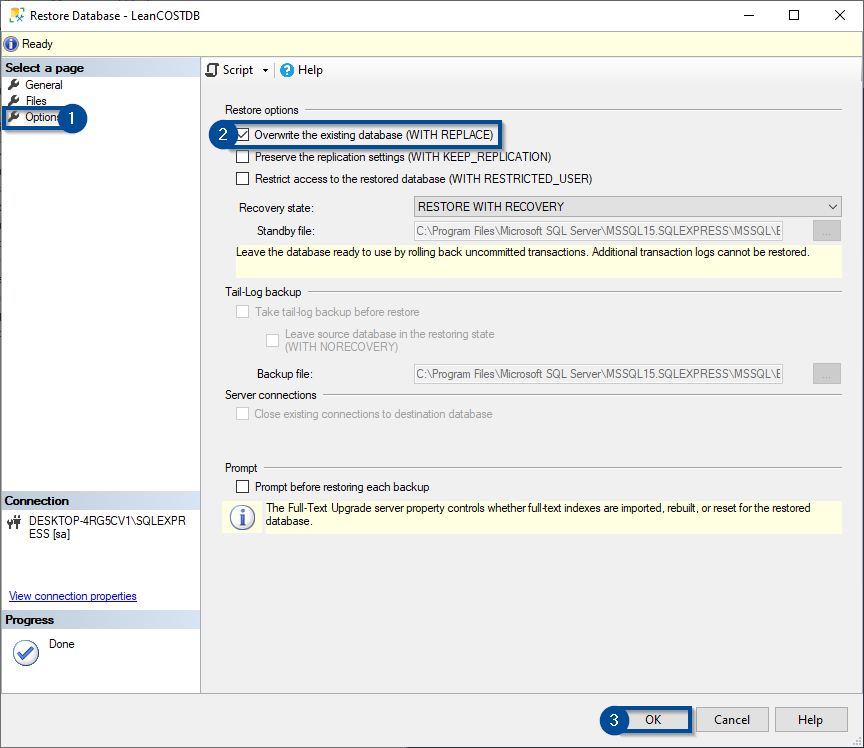
Now, select “Options” in left menu and select “Overwrite the existing database (WITH REPLACE)” option and, finally, press “OK” button to start the restoration.
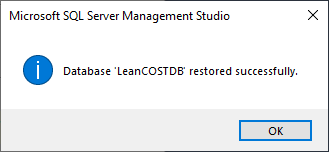
Once the restoration procedure has been completed, you’ll recieve this message meaning that the database was created.
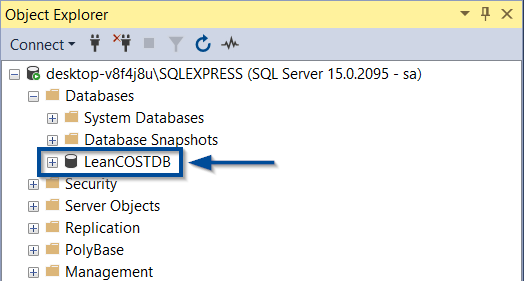
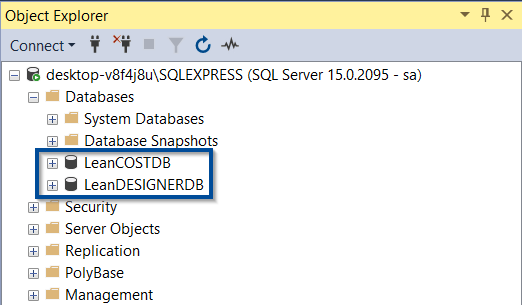
The “LeanCOSTDB” will be listed under the “Databases” node.
After you restored the “LeanCOSTDB” database, you must repeat the same process to restore the “LeanDESIGNERDB” database as well.
Right click on the “Databases” node, then select “Restore Database…” in the context menu.

The “Restore Database” window wil open: here follow the steps shown in the next picture.
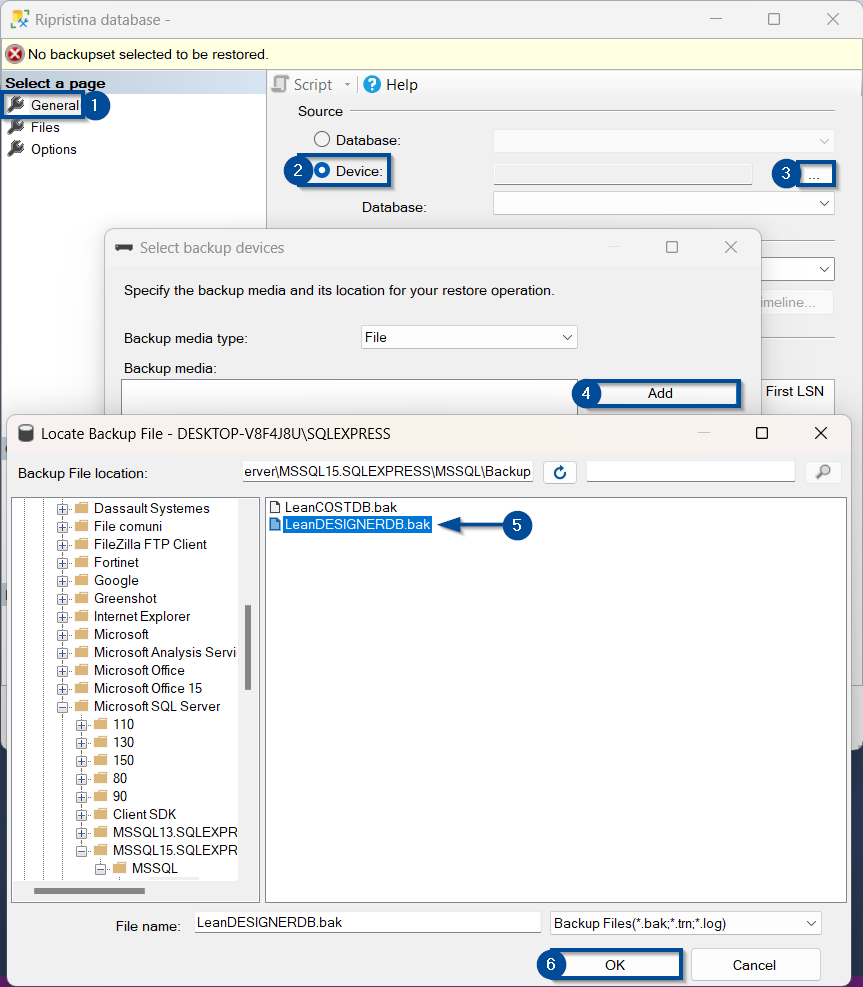
Once pressed “OK” at step 6 of the previous image, the path of the file “LeanCOSTDB.bak” to restore will appear in the “Select backup devides” window: here press “OK” to go on with the restoration.
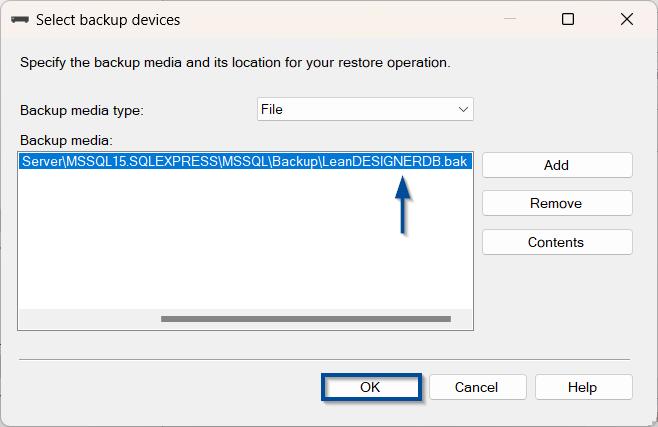
After having pressed “OK” you’ll be redirected to the “Restore database” window.
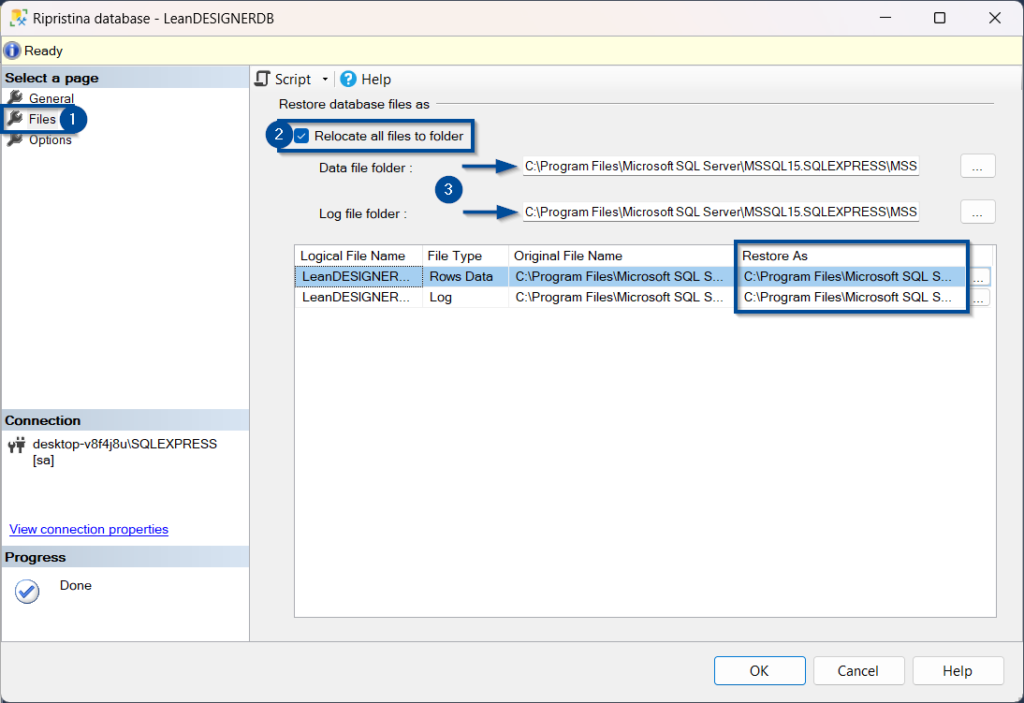
If you want to change the path where the data and log files will be savedelect “Files” in the left menu, check “Relocate all files to folder” and type the desired path in the “Data file folder” and “Log file folder” textboxes.
Make sure the paths are correct in the “Restore As” column.
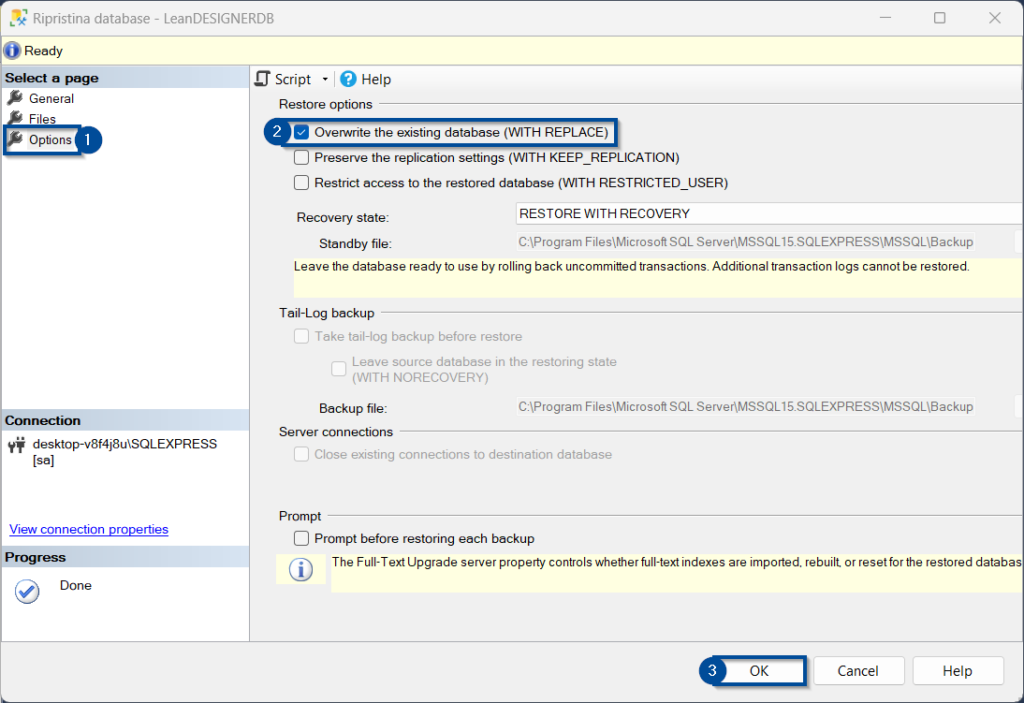
Now, select “Options” in left menu and select “Overwrite the existing database (WITH REPLACE)” option and, finally, press “OK” button to start the restoration.
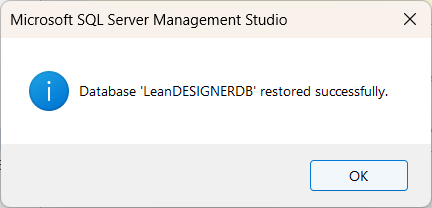
Once the restoration procedure has been completed, you’ll recieve this message meaning that the database was created.
Both database will be listed under the “Databases” node.
Setting the “db_owner” user
To let LeanCOST open successfully with the updated database, it is necessary to check that the user created for the LeanCOST database (usually named “leanuser”) is “db_owner” of the “LeanCOSTDB” database.
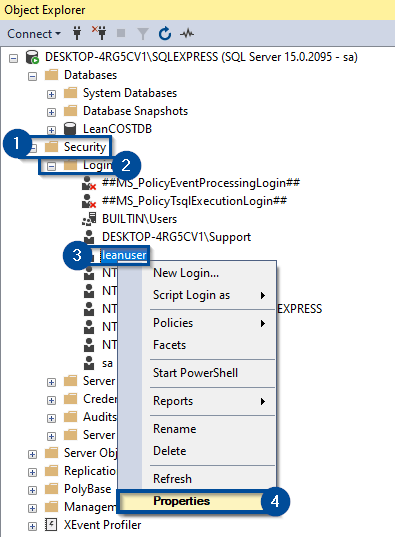
Open “Security” node in the SQL instance where the LeanCOST database is stored. Open the subnode named “Logins”: here there will be the user created for LeanCOST database (suggested name = “leanuser”).
Select the user created for LeanCOST database, right click on it and select “Properties” voice in the context menu.
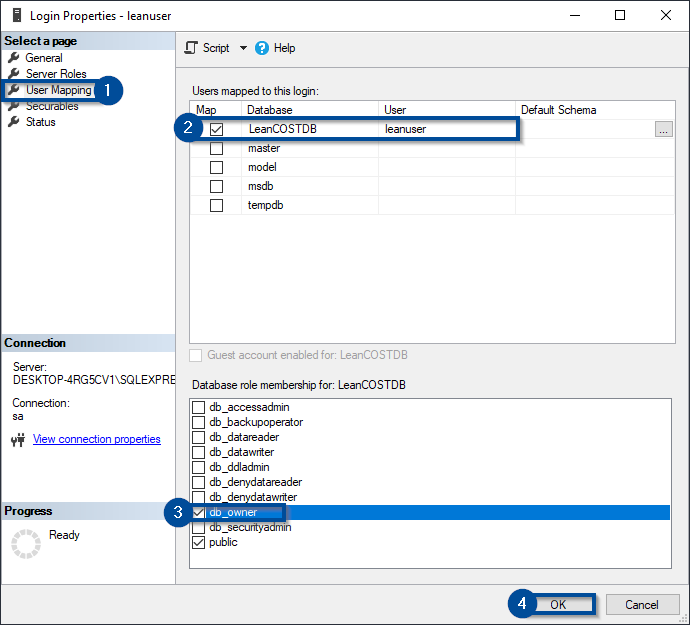
The “Login Properties” window will appear: select “User Mapping” on the left.
Then, select “LeanCOSTDB” database under the “User mapped to this login” table. Finally, check that “db_owner” is flagged. If it is not, select it and press “OK”.
After you set up the “db_owner” for the “LeanCOSTDB” database, you must repeat the same process for the “LeanDESIGNERDB” database as well.
Crypt and configure the connection string “.reg” file
Crypting operations of the strings to connect to “LeanCOSTDB” and “LeanDESIGNERDB” in MsSQL can be done on MsSQL server or on a client machine.
Before encrypting the registry keys, you need to add the keys in your System Registry.
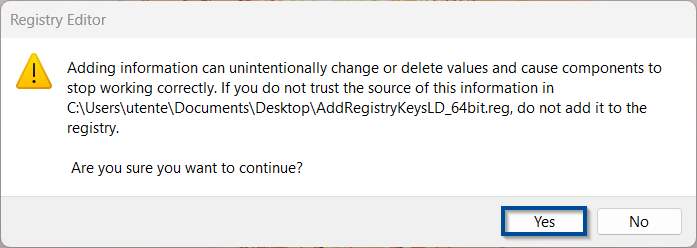
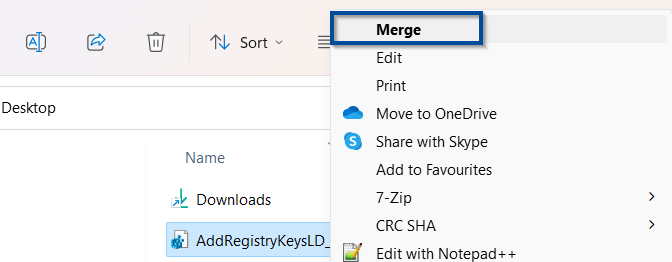
Open the shared “…\LeanDESIGENER_Deploy\Settings” folder and select the file “AddRegistryKeysLD_64bit.reg”. Right-click on it and click “Merge” from the context menu.
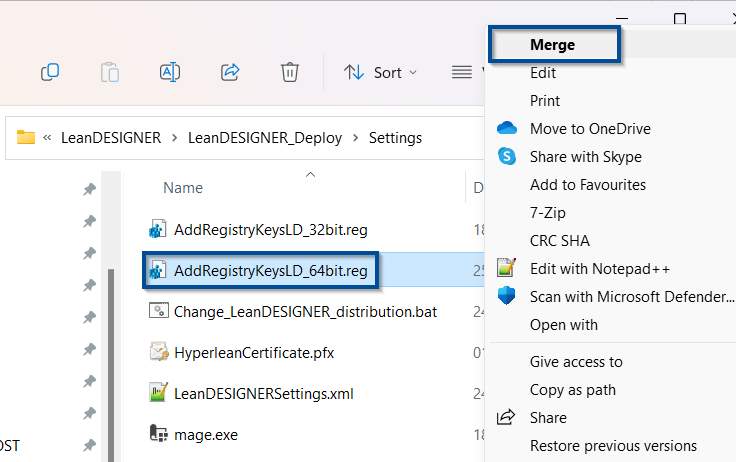
Click “Yes” then “OK” buttons respectively on the two windows that will open.

The procedure to follow to encrypt the connection string to the databases “LeanDESIGNERDB” and “LeanCOSTDB” in MsSQL is:
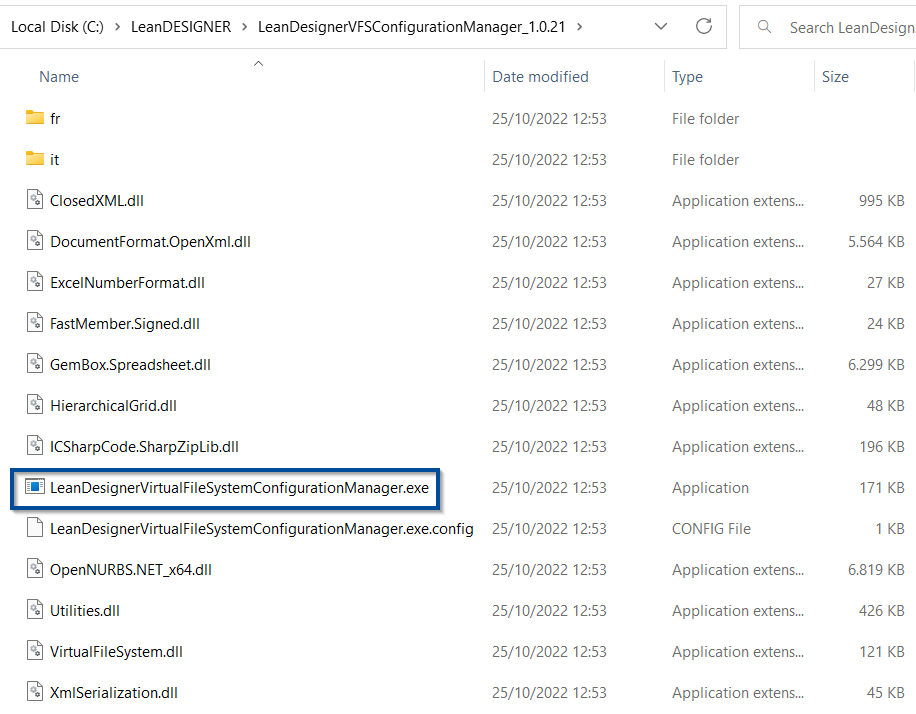
Download the file “LeanDesignerVSFConfigurationManager_X.x.x.zip” from the link Hyperlean Support sent you then unzip it. Run the application “LeanDesignerVirtualFileSystemConfigurationManager.exe” as administrator (right-click then “Run as administrator”).
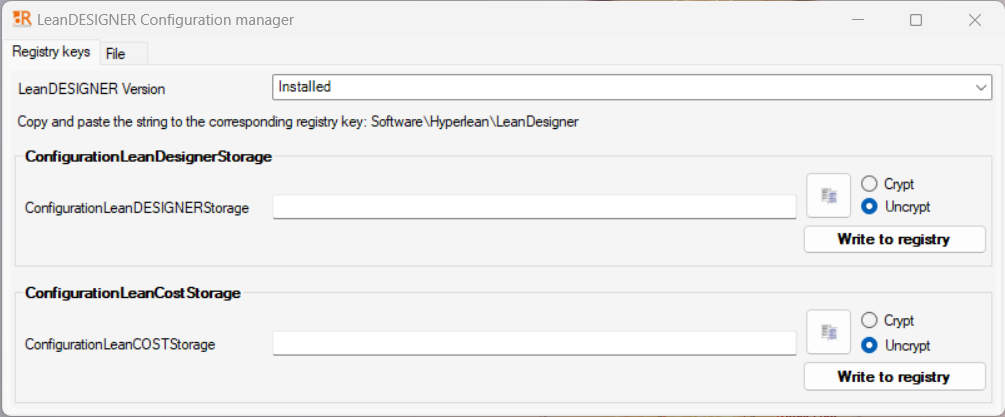
The configuration manager will open:
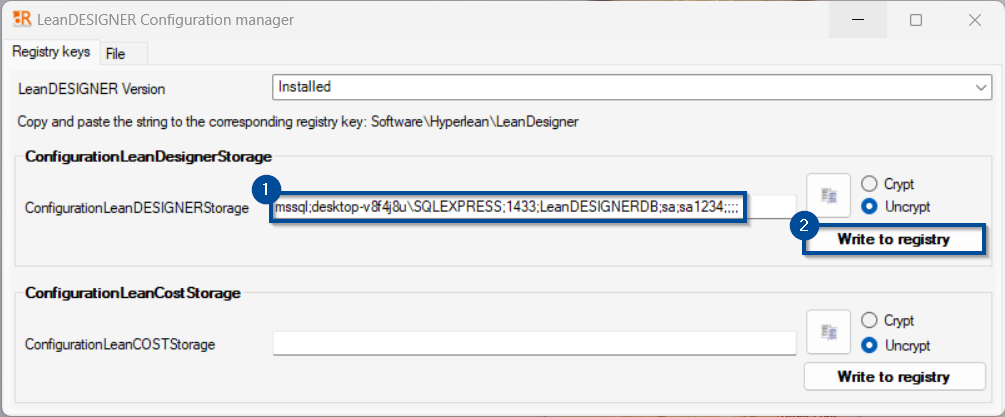
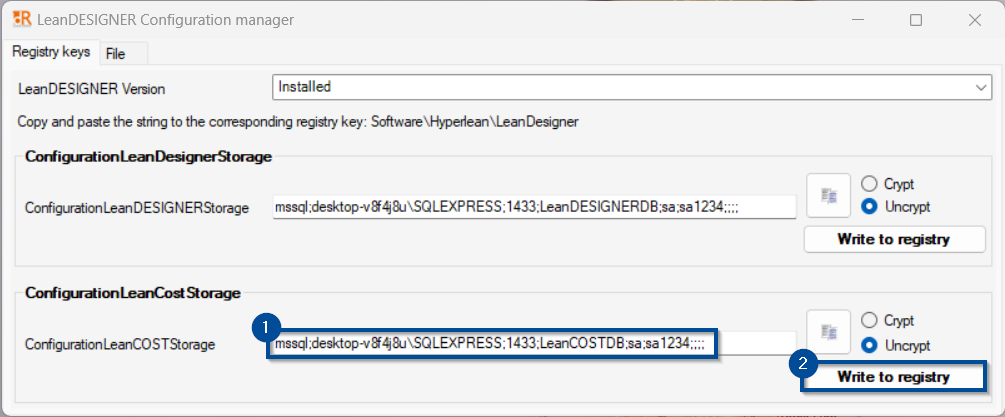
Type in “ConfigurationLeanDESIGNERStorage” a string with the following syntax:
mssql;<DBServerName>\<InstanceName>;<Port>;<DBName>;<DBUserName>;<Password>;;;;
Where:
- <DBServerName> SQL server name where the db is stored
- <InstanceName> instance name where the db is stored
- <Port> port number used to connect to MsSQL, usually 1433
- <DBName> database name, usually “LeanDESIGNERDB”
- <DBUserName> username of the db_owner, usually “leanuser”
- <Password> db_owner user password
Then click “Write to registry” to add the key to the System Registry.
Type in “ConfigurationLeanCOSTStorage” a string with the following syntax:
mssql;<DBServerName>\<InstanceName>;<Port>;<DBName>;<DBUserName>;<Password>;;;;
Where:
- <DBServerName> SQL server name where the db is stored
- <InstanceName> instance name where the db is stored
- <Port> port number used to connect to MsSQL, usually 1433
- <DBName> database name, usually “LeanCOSTDB”
- <DBUserName> username of the db_owner, usually “leanuser”
- <Password> db_owner user password
Then click “Write to registry” to add the key to the System Registry.
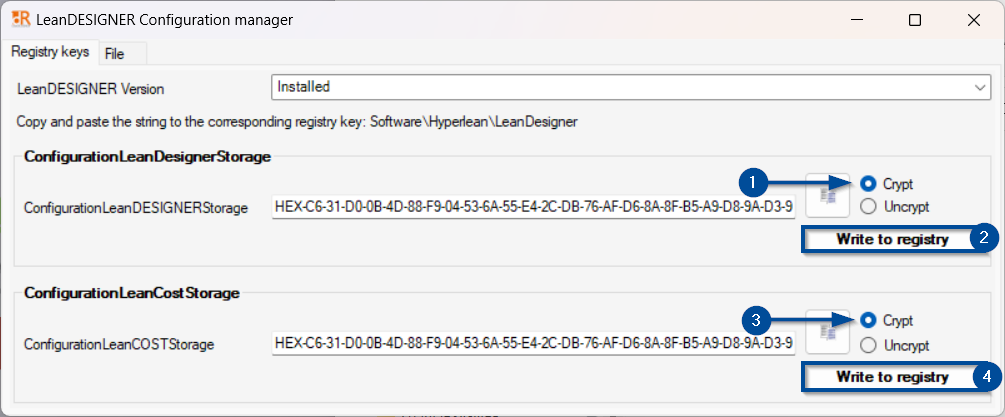
To encrypt the value of the strings, flag “Crypt” by the value, then click “Write to registry”: do the same for both strings.
Do not close LeanDESIGNER Configuration manager.
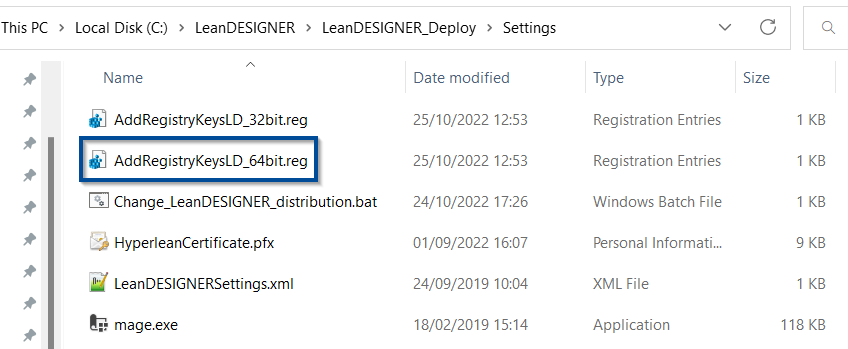
Browse to the “…\LeanDESIGNER\LeanDESIGNER_Deploy\Settings” folder and open the “AddRegistryKeysLD_64bit.reg” file with a text editor.
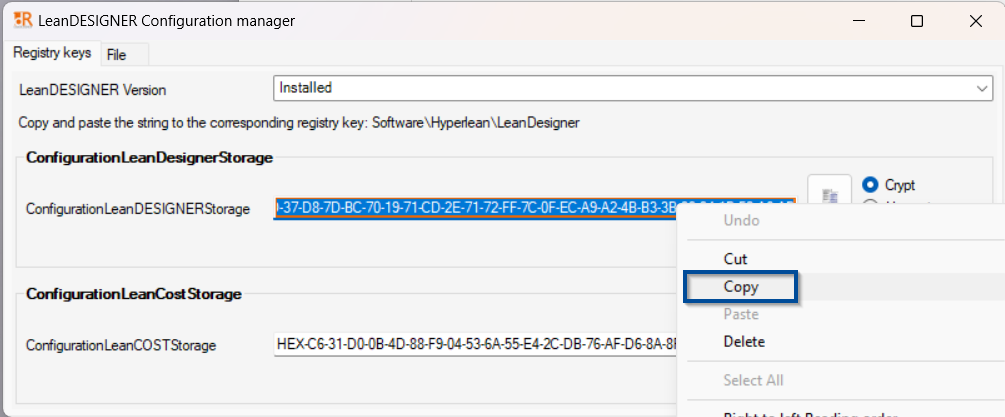
Here, you need to paste the crypted strings in their respective values: “ConfigurationLeanDESIGNERStorage” and “ConfigurationLeanCOSTStorage” .

You can either copy them from the LeanDESIGNER Configuration manager (right mouse click -> copy) or directly form your System Registry (Computer\HKEY_LOCAL_MACHINE\SOFTWARE\WOW6432Node\HyperLean\LeanDesigner).
Paste each encrypted string in the related key inside the “.reg” file.
You shall remain between quotes.

Save the updated file “.reg” the “…\LeanDESIGNER\LeanDESIGNER_Deploy\Settings” folder.
If you added the registry keys on the SQL server, once you configured the file “.reg” as described above, you can delete them because they are not necessary.
Now you can install LeanDESIGENER on each client machine by following the procedure described on the next chapter.
4. Client-side installation
Preliminary step
Before installing LeanDESIGENER ClickOnce on a client PC, make sure that LeanDESIGENER was not already installed with MSI. If it was, you must unistall it and restart the PC.
To unistall LeanDESIGENER (MSI) open the “Control Panel”, select “Programs” and then “Unistall program.” Look for “LeanDESIGENER” on the list, select it and click “Uninstall”. Wait for the unistallation to end then restart the PC.
Client installation (ClickOnce)
N.B.: During the first installation, your user must have administrator rights to install LeanDESIGENER ClickOnce. The reason is that, during the first installation, you will have to install the license manager and set a registry key with the path to the ServerData folder and these operations can be done only with administrator permission.
Additionally, If the client has multilpe accounts that will have to use LeanDESIGENER , you must install LeanDESIGENER ClickOnce for each account, since the ClickOnce installation is linked to the user’s account, not to the PC.
Open the shared “…\LeanDESIGENER_Deploy\Settings” folder,copy the “AddRegistryKeysLD_64bit.reg” file and paste it in your desktop.
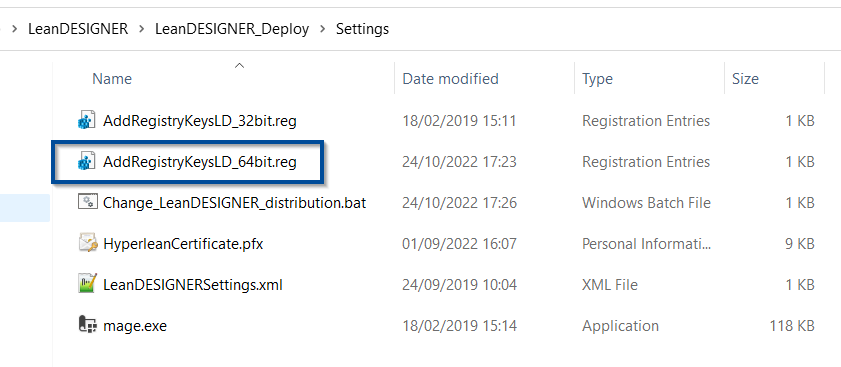
Press right mouse button on the “AddRegistryKeys_64bit.reg” file that you pasted in your desktop and click on “Merge”.
Press “Yes” and “Ok” on the next two windows that will open.


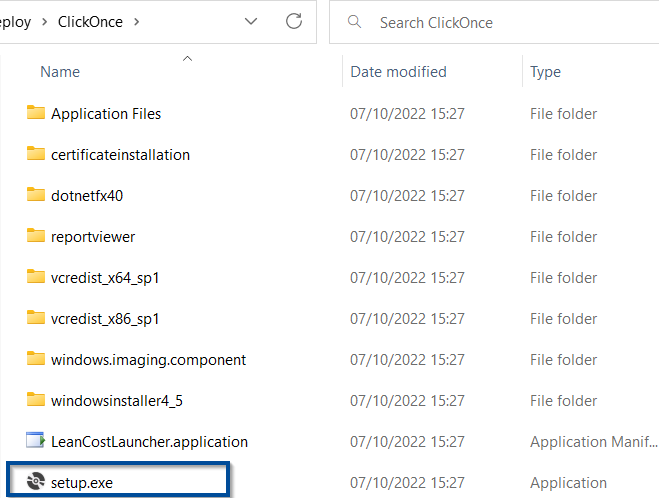
Open the shared “…\LeanDESIGENER _Deploy\ClickOnce” folder and double click on the “Setup.exe” to install LeanDESIGENER. The LeanDESIGENER setup process will automatically start.
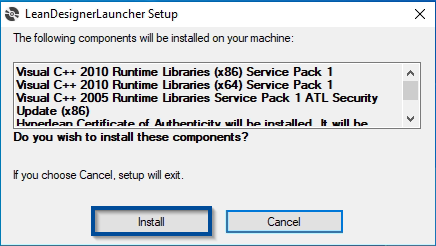
In every machine where LeanDESIGENER is installed for the first time, some prerequisites will be automatically installed.
Click “Install” to accept the installation of the necessary prerequisites.
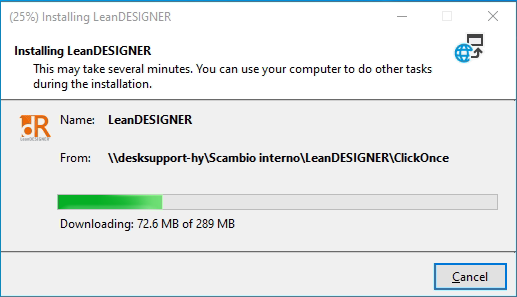
Next pictures show the installation progress.
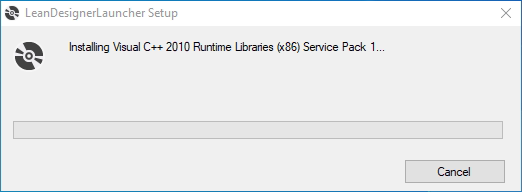
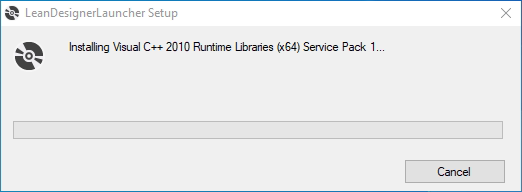
The installation of the prerequisites is not always necessary: if a previous release of LeanDESIGENER had been installed on that client, they will not be installed again.
Amongst orther prerequisites, the “Hyperlean S.r.l.” certificate of authenticity will be installed: click “Yes” in the following windows.
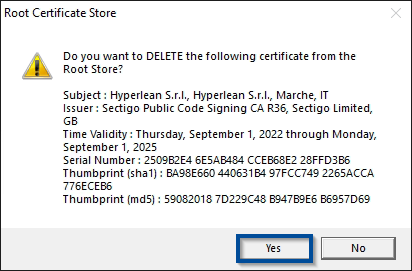
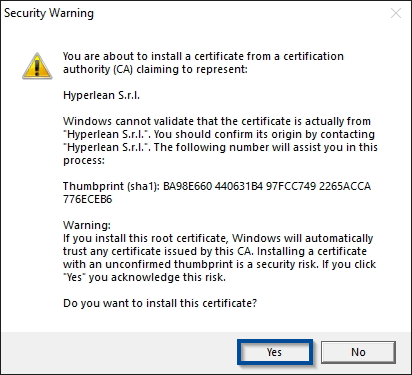
After the installation of all prerequisites, the LeanDESIGENER installation will start.
Once the installation has ended, the login window of LeanDESIGENER will open: Select language, type username and password, then click “Ok”.
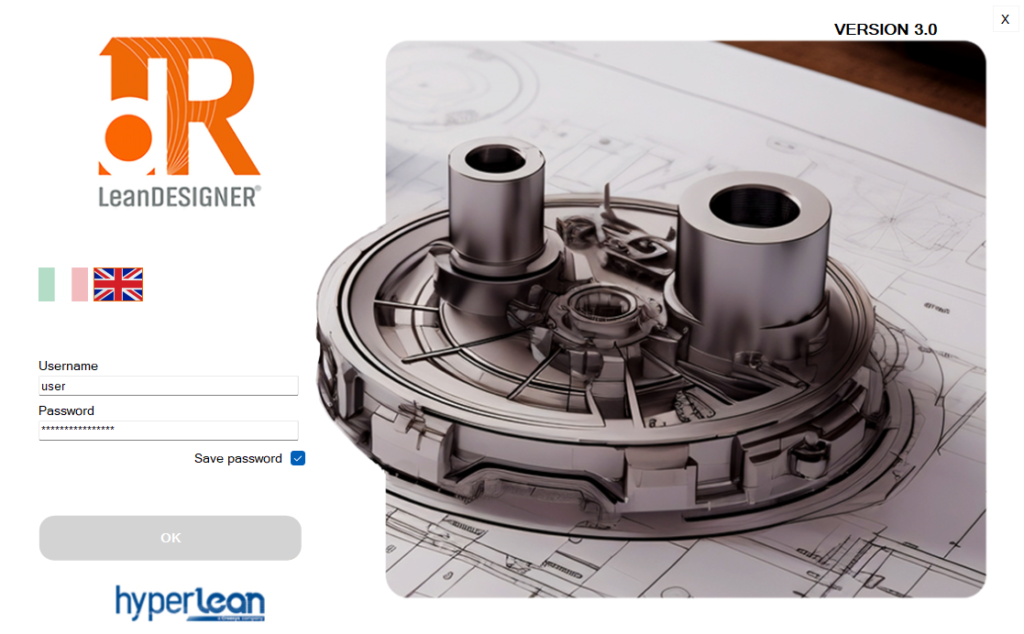
Wait for the LeanDESIGENER interface to open.
If you run into any problems, contact support@hyperlean.eu.